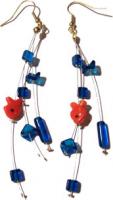
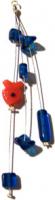
You can create a really cute pair of earrings using fish beads, following an under-the-sea theme. By having drops of bright blue beads, and a fish bead on each earring, you can create the look of a cute little fish swimming through the ocean when you make these fish earrings.
Fish beads can be bought from many bead stores, or online. With the popularity of "Finding Nemo", you can also get quite a few clownfish beads, excellent for any fan to find!
This project uses goldfish beads, although any type of fish bead will work really well.
Materials
You will need the following materials to make fish earrings:
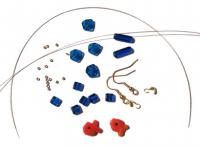
- Pliers
- About 20 inches Tiger-tail should be plenty
- 2 clam-shells
- 2 earring hooks
- 16 crimps
- 2 goldfish beads
- 6 small, flat square beads (blue)
- 4 Flat, curvy feature beads (blue)
- 2 Long glass tube beads (blue)
Instructions
- Cut three pieces of tiger-tail, roughly about three inches each.
- Thread a clam-shell through each piece of tiger-tail, followed by a crimp.
- Squash the crimp with using the pliers, making sure that it has been squashed at the end of all three pieces of tiger-tail.
- Close the clam-shell around the crimp.
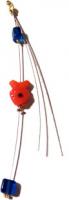
- Take the longest piece of tiger-tail, and thread on one of the flat square beads, followed by a crimp.
- Position the bead about half an inch beneath the clam-shell, these squash the crimp to hold it in place.
- On the same piece of tiger-tail, thread on a goldfish bead and a crimp.
- Position it about halfway along the tiger-tail, then squash the crimp to hold the bead in place.
- Take another square, flat bead and thread it onto the same piece of tiger-tail followed by a crimp bead.
- Squash the crimp bead right at the end of the tiger-tail.
- Take a different piece of tiger-tail, and thread the curvy feature bead onto it, followed by a crimp bead.
- Adjust the position of the curvy feature bead so that it hangs beneath the top bead and above the goldfish on the other piece of tiger-tail, then squash the crimp in place.
- Thread a long, glass tube bead onto this same piece of tiger-tail, followed by a crimp.
- Position the long, glass tube bead to sit just above the bottom bead on the other drop, then squash the crimp in place.
- Cut off the excess tiger-tail on the second drop.
- Take the last piece of tiger-tail, and thread on a flat square bead, followed by a crimp.
- Position this bead so that it roughly sits between the top beads on the other two drops, and squash the crimp in place.
- Thread a curvy feature bead onto this last piece of tiger-tail, followed by a crimp.
- Position this bead so that it sits just above the last bead on the second piece of tiger-tail, then squash the crimp in place.
- Cut off any excess tiger-tail on the last piece of tiger-tail.
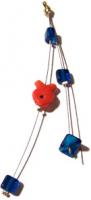
- Thread the loop of the earring hook through the connecting loop on top of the clam-shell, and close.
- You have now finished one earring. Repeat steps 1-21 to complete the pair.
Conclusion
These fish earrings will make the fish beads look like they are swimming every time you move your head. The fish earrings are so fun to wear that you'll want to wear them every day!
If you like, add some more drops of tiger-tail with some bright green seed beads - it will look like seaweed!
login to post comments
